Selasa, 22 Oktober 2013
Easy Origami Heart
Easy Origami Heart
This easy origami heart is perfect for Valentine's Day. It's very simple to make and perfect for everyone. Make one or make 10 and give them to your Valentines!
![Be my Valentine! completed Easy Origami Heart](http://www.origami-instructions.com/images/easy-heart/thumbnails/21-easy-heart.jpg)
Easy Origami Heart Step 1: Start with a square 6" x 6" (15cm x 15cm) origami paper color side down.
![Step 1 Easy Origami Heart Step 1](http://www.origami-instructions.com/images/easy-heart/thumbnails/01-easy-heart.jpg)
Easy Origami Heart Step 2 & 3: Fold it in half and open it back up.
![Step 2 Easy Origami Heart Step 2](http://www.origami-instructions.com/images/easy-heart/thumbnails/02-easy-heart.jpg)
![Step 3 Easy Origami Heart Step 3](http://www.origami-instructions.com/images/easy-heart/thumbnails/03-easy-heart.jpg)
Easy Origami Heart Step 4: Now fold the other side in half and open it back up so that you have 2 creases on the origami paper like so:
![Step 4 Easy Origami Heart Step 4](http://www.origami-instructions.com/images/easy-heart/thumbnails/04-easy-heart.jpg)
Easy Origami Heart Step 5: Now fold the top point of the paper to meet the crease in the center:
![Step 5 Easy Origami Heart Step 5](http://www.origami-instructions.com/images/easy-heart/thumbnails/05-easy-heart.jpg)
![Step 5 Easy Origami Heart Step 5](http://www.origami-instructions.com/images/easy-heart/thumbnails/06-easy-heart.jpg)
Easy Origami Heart Step 6: Fold the bottom point to meet the top:
![Step 6 Easy Origami Heart Step 6](http://www.origami-instructions.com/images/easy-heart/thumbnails/07-easy-heart.jpg)
![Step 6 Easy Origami Heart Step 6](http://www.origami-instructions.com/images/easy-heart/thumbnails/08-easy-heart.jpg)
Easy Origami Heart Step 7: Fold the right side to meet the crease in the center:
![Step 7 Easy Origami Heart Step 7](http://www.origami-instructions.com/images/easy-heart/thumbnails/09-easy-heart.jpg)
![Step 7 Easy Origami Heart Step 7](http://www.origami-instructions.com/images/easy-heart/thumbnails/10-easy-heart.jpg)
Easy Origami Heart Step 8: Fold the left side to meet the crease in the center and you should get this:
![Step 8 Easy Origami Heart Step 8](http://www.origami-instructions.com/images/easy-heart/thumbnails/11-easy-heart.jpg)
Easy Origami Heart Step 9: Can you see the heart already? We're almost done! Flip the paper over to the opposite side:
![Step 9 Easy Origami Heart Step 9](http://www.origami-instructions.com/images/easy-heart/thumbnails/12-easy-heart.jpg)
Easy Origami Heart Step 10: Now you will make a fold on the right
side. See the dash lines I've drawn on the paper? That's where you'll
make the folds.
![Step 10 Easy Origami Heart Step 10](http://www.origami-instructions.com/images/easy-heart/thumbnails/13-easy-heart.jpg)
![Step 10 Easy Origami Heart Step 10](http://www.origami-instructions.com/images/easy-heart/thumbnails/14-easy-heart.jpg)
Easy Origami Heart Step 11: Fold the left side now.
![Step 11 Easy Origami Heart Step 11](http://www.origami-instructions.com/images/easy-heart/thumbnails/16-easy-heart.jpg)
Easy Origami Heart Step 12: Now you will fold the top points. See the dash lines in the picture below? That's where you'll make the folds. Fold the right side and then the left side.
![Step 12 Easy Origami Heart Step 12](http://www.origami-instructions.com/images/easy-heart/thumbnails/17-easy-heart.jpg)
![Step 12 Easy Origami Heart Step 12](http://www.origami-instructions.com/images/easy-heart/thumbnails/18-easy-heart.jpg)
![Step 12 Easy Origami Heart Step 12](http://www.origami-instructions.com/images/easy-heart/thumbnails/19-easy-heart.jpg)
Easy Origami Heart Step 13: Flip the paper over and voila! You've got yourself an easy origami heart!
![Completed Origami Heart completed Easy Origami Heart](http://www.origami-instructions.com/images/easy-heart/thumbnails/20-easy-heart.jpg)
![Be my Valentine! completed Easy Origami Heart](http://www.origami-instructions.com/images/easy-heart/thumbnails/21-easy-heart.jpg)
Check out the many easy origami heart photos that have been submitted by our readers!
Sumber : Origami-instruction.com
Origami Lily
Origami Lily
The origami lily is a classic and popular origami flower. Did you know
that the lily family traditionally represented innocence and purity?
Lilies can be found in a variety of hybrids and colors including yellow,
pink, white, orange, purple, red and many others.
![completed origami lily Origami Lily flower photo diagrams 20](http://www.origami-instructions.com/images/lily/thumbnails/21-origami-lily.jpg)
The origami lily is not too difficult to fold but
beginners may find the petal fold slightly challenging. Just take your
time and follow each step slowly. If you prefer video, check out our origami lily video instructions.
If you're giving your origami lily to someone as a gift, do use an extra special paper such as these gorgeous Fabric Textured Origami Paper![](http://www.pjtra.com/i/RUBES0ZESEBFSUZJR0BETEpJSw)
Or use these Washi Origami Paper with raised patterns and subtle gold flecks.
Start with a
6 inch square piece of origami paper, and fold it into a water
balloon base.
Next, take one of the four corners of the base and squash fold it as shown below.
![origami water balloon base Origami Lily flower photo diagrams 1](http://www.origami-instructions.com/images/lily/thumbnails/01-origami-lily.jpg)
![beginning squash fold Origami Lily flower photo diagrams 2](http://www.origami-instructions.com/images/lily/thumbnails/02-origami-lily.jpg)
Repeat the squash fold for the other three corners, to give the kite shape shown below.
![more squash fold Origami Lily flower photo diagrams 3](http://www.origami-instructions.com/images/lily/thumbnails/03-origami-lily.jpg)
![completed squash fold Origami Lily flower photo diagrams 4](http://www.origami-instructions.com/images/lily/thumbnails/04-origami-lily.jpg)
![four squash folds completed to make kite shape Origami Lily flower photo diagrams 5](http://www.origami-instructions.com/images/lily/thumbnails/05-origami-lily.jpg)
Now fold the lower edges of the kite into the centerline, then unfold. Fold the top corner down, then unfold.
![lower edges of kite folded into centerline Origami Lily flower photo diagrams 6](http://www.origami-instructions.com/images/lily/thumbnails/06-origami-lily.jpg)
![previous fold unfolded Origami Lily flower photo diagrams 7](http://www.origami-instructions.com/images/lily/thumbnails/07-origami-lily.jpg)
![top of kite folded down to make crease Origami Lily flower photo diagrams 8](http://www.origami-instructions.com/images/lily/thumbnails/08-origami-lily.jpg)
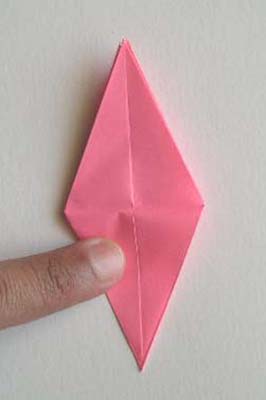
You will now have crease marks on the piece, that will be used in the next step. Place your finger under the lower point of the kite, and fold upwards as shown. This is a petal fold.
![crease marks ready for petal fold Origami Lily flower photo diagrams 9](http://www.origami-instructions.com/images/lily/thumbnails/09-origami-lily.jpg)
![beginning petal fold Origami Lily flower photo diagrams 10](http://www.origami-instructions.com/images/lily/thumbnails/10-origami-lily.jpg)
![more petal fold Origami Lily flower photo diagrams 11](http://www.origami-instructions.com/images/lily/thumbnails/11-origami-lily.jpg)
Now repeat the petal fold three more times to give another,
smaller kite.
![petal fold completed Origami Lily flower photo diagrams 12](http://www.origami-instructions.com/images/lily/thumbnails/12-origami-lily.jpg)
![four petal folds completed Origami Lily flower photo diagrams 13](http://www.origami-instructions.com/images/lily/thumbnails/13-origami-lily.jpg)
Now fold one point of the kite downwards as shown. Repeat 3 more times for a diamond shape.
![folding point of kite down Origami Lily flower photo diagrams 14](http://www.origami-instructions.com/images/lily/thumbnails/14-origami-lily.jpg)
![kite point folded down](http://www.origami-instructions.com/images/lily/thumbnails/15-origami-lily.jpg)
![4 kite points folded down Origami Lily flower photo diagrams 15](http://www.origami-instructions.com/images/lily/thumbnails/16-origami-lily.jpg)
Next fold the upper edges of the diamond into the
centerline. Repeat three more times.
![top edges of kite folded to centerline Origami Lily flower photo diagrams 16](http://www.origami-instructions.com/images/lily/thumbnails/17-origami-lily.jpg)
![all top edges of kite folded in Origami Lily flower photo diagrams 17](http://www.origami-instructions.com/images/lily/thumbnails/18-origami-lily.jpg)
Now turn the piece upside down. Start folding out the four petals of the flower as shown.
You can create a nice curling effect
in the petals like this: hold the base of a petal in your left fingers, then run
your right thumb and pen (or pencil) along the length of the petal.
Your
thumb is in front and the pen in the back. (In the picture below, we've
omitted the left hand for clarity).
Repeat this motion several times to
cause the paper petal to curl.
![beginning to fold lily petals out Origami Lily flower photo diagrams 18](http://www.origami-instructions.com/images/lily/thumbnails/19-origami-lily.jpg)
![using a pen to curl the petals of the lily Origami Lily flower photo diagrams 19](http://www.origami-instructions.com/images/lily/thumbnails/20-origami-lily.jpg)
And now your origami lily is complete!
![completed origami lily Origami Lily flower photo diagrams 20](http://www.origami-instructions.com/images/lily/thumbnails/21-origami-lily.jpg)
The origami lily is very popular and has been folded by many visitors of this website. Check out the readers' photo page.
Readers have even folded and used origami lilies at their wedding!
Sumber : Origami-instruction.com
Cara Membuat Poster Film Menggunakan Adobe Photoshop
Alhamdulillah .. bisa posting lagi.. Setelah sekian lama vakum karena banyak masalah ini itu, itu ini di server… akhirnya semua berjalan normal lagi… kecuali Halaman Member belom dibalikin ke web ilmuphotoshop.. masih di web sigiteko.com… Sekarang web ilmuphotoshop.com sudah dapat rekanan penyedia hosting baru yang mudah-mudahan gak akan ada problemo lagi. Webhosting nya bernama AXIADATA. Saya ucapkan Terima kasih untuk AXIADATA yang sudah bersedia bekerjasama dengan ilmuphotoshop.. mudah-mudahan bisa jangka panjang … amin..![:D](http://ilmuphotoshop.com/wp-includes/images/smilies/icon_biggrin.gif)
Okey… sekarang kita ke tutorialnya yah..
Bentar.. buka baju dulu.. gerah banget nih..
![:D](http://ilmuphotoshop.com/wp-includes/images/smilies/icon_biggrin.gif)
Buka dokumen baru ukuran A4 ..dengan resolusi 300 dpi.
![1](http://ilmuphotoshop.com/wp-content/uploads/2012/05/11.jpg)
Warnai halaman baru tadi dengan warna hitam dengan menggunakan Paint bucket tool..
![2](http://ilmuphotoshop.com/wp-content/uploads/2012/05/2.jpg)
Sekarang buka gambar latar belakang nya.. saya pake latar belakang kota aja ya.. biar keren
![:)](http://ilmuphotoshop.com/wp-includes/images/smilies/icon_smile.gif)
Drag gambar kota New York tadi ke dokumen baru…
Bahan gambarnya silahkan download disini
![3](http://ilmuphotoshop.com/wp-content/uploads/2012/05/3.jpg)
atur gambar nya supaya fit.. gepeng-gepeng gpp… karena nanti itu hanya background yang nanti gak keliat juga.
![4](http://ilmuphotoshop.com/wp-content/uploads/2012/05/4.jpg)
Action selanjutnya adalah buka gambar api … drag ke dokumen juga..
![5](http://ilmuphotoshop.com/wp-content/uploads/2012/05/5.jpg)
Sekarang hilangkan background kotak nya.. karena kita cuman butuh gambar api nya saja.
Klik add layer mask di layer palette.
Brush seputar gambar api dengan warna hitam…
![6](http://ilmuphotoshop.com/wp-content/uploads/2012/05/6.jpg)
jelas kan ?
lanjut yah.. sekarang duplikat gambar api yang sudah dihilangin background nya tadi.. dengan cara ALT + Drag ke samping kanan.
![7](http://ilmuphotoshop.com/wp-content/uploads/2012/05/7.jpg)
Edit kedua gambar api terserbut dengan mengurangi kontras dan warna nya.. dengan menggunakan hue/saturation
![8](http://ilmuphotoshop.com/wp-content/uploads/2012/05/8.jpg)
Sekarang buka gambar HULK dan Drag ke dokumen baru
![9](http://ilmuphotoshop.com/wp-content/uploads/2012/05/9.jpg)
Atur letaknya seperti ini
![10](http://ilmuphotoshop.com/wp-content/uploads/2012/05/10.jpg)
Seleksi gambar HULK dengan menggunakan PEN Tool.. sebenernya bisa pake magic wand tool.. tapi saya lebih seneng pake PEN Tool karena hasilnya bisa lebih bagus..
Ini pekerjaan yang butuh ketelitian dan menyenangkan.. bisa bikin mata jereng-jereng hehehehe..
![11](http://ilmuphotoshop.com/wp-content/uploads/2012/05/111.jpg)
Klik disini untuk penggunaan PEN Tool lebih jelas
Kalo ada kesalahan klik waktu seleksi dengan PEN tool.. tekan CTRL + Z (undo) atau CTRL + ALT + Z kalo salahnya banyak..
kalo udah beres seleksinya.. klik kanan layar lalu pilih Make selection
![12](http://ilmuphotoshop.com/wp-content/uploads/2012/05/12.jpg)
Hasilnya nanti bakal seperti ini :
![13](http://ilmuphotoshop.com/wp-content/uploads/2012/05/13.jpg)
Kebetulan sekali si HULK punya background hitam.. jadi tinggal add layer mask aja.. biar hitam nya ilang..
![13-a](http://ilmuphotoshop.com/wp-content/uploads/2012/05/13-a.jpg)
Hasilnya akan seperti ini :
![14](http://ilmuphotoshop.com/wp-content/uploads/2012/05/14.jpg)
Karena dibagian bawah nya akan dipake buat Credit Text… jadi harus agak gelap.. soalnya nanti text nya berwarna putih..
Buat layer baru di paling atas … Klik Layer > new > layer
Brush bagian bawahnya dengan warna hitam.. secukupnya aja..
![15](http://ilmuphotoshop.com/wp-content/uploads/2012/05/15.jpg)
Turunkan opacity brush hitam menjadi 75%
![16](http://ilmuphotoshop.com/wp-content/uploads/2012/05/16.jpg)
Sekarang tulis judulnya.. dengan warna Hitam atau terserah aja.. font nya musti agak tebal . saya pake font IMPACT.(bisa cari di internet kalo gak ada). IMPACT itu font tebel.. jadi keliatan garang … jangan pake Times new roman ya.. hehehe.. nanti gak serem judulnya..
![17](http://ilmuphotoshop.com/wp-content/uploads/2012/05/17.jpg)
Klik kanan layer tulisan > blending options
Pilih outer glow dengan warna hijau .. size nya dibesarin dikit biar keliatan glow nya.
![18](http://ilmuphotoshop.com/wp-content/uploads/2012/05/18.jpg)
Buat Credit Text ( seperti judul nya apa, produksi mana, pemeran nya siapa dll ) .. sekarang ngarang sendiri aja ya.. terserah mau nulis apa juga..ini pake font ARIAL biasa gpp..
![19](http://ilmuphotoshop.com/wp-content/uploads/2012/05/19.jpg)
Setting di Type palette nya.. Horizontal scale jadi 50% supaya hurufnya lebih rapet.
![20](http://ilmuphotoshop.com/wp-content/uploads/2012/05/20.jpg)
Kecilin sebagian hurufnya supaya lebih mirip dengan Credit Text..
![21](http://ilmuphotoshop.com/wp-content/uploads/2012/05/211.jpg)
tambahkan logo Dolby
![22](http://ilmuphotoshop.com/wp-content/uploads/2012/05/22.jpg)
Hasil akhirnya akan seperti ini :
![hasil](http://ilmuphotoshop.com/wp-content/uploads/2012/05/hasil.jpg)
gimana ? gampang kan ?
:: nb : Man Jadda Wa jada ( yang bersungguh-sungguh pasti berhasil )
Langganan:
Postingan
(
Atom
)