Selasa, 22 Oktober 2013
Origami Lily
Origami Lily
The origami lily is a classic and popular origami flower. Did you know
that the lily family traditionally represented innocence and purity?
Lilies can be found in a variety of hybrids and colors including yellow,
pink, white, orange, purple, red and many others.
![completed origami lily Origami Lily flower photo diagrams 20](http://www.origami-instructions.com/images/lily/thumbnails/21-origami-lily.jpg)
The origami lily is not too difficult to fold but
beginners may find the petal fold slightly challenging. Just take your
time and follow each step slowly. If you prefer video, check out our origami lily video instructions.
If you're giving your origami lily to someone as a gift, do use an extra special paper such as these gorgeous Fabric Textured Origami Paper![](http://www.pjtra.com/i/RUBES0ZESEBFSUZJR0BETEpJSw)
Or use these Washi Origami Paper with raised patterns and subtle gold flecks.
Start with a
6 inch square piece of origami paper, and fold it into a water
balloon base.
Next, take one of the four corners of the base and squash fold it as shown below.
![origami water balloon base Origami Lily flower photo diagrams 1](http://www.origami-instructions.com/images/lily/thumbnails/01-origami-lily.jpg)
![beginning squash fold Origami Lily flower photo diagrams 2](http://www.origami-instructions.com/images/lily/thumbnails/02-origami-lily.jpg)
Repeat the squash fold for the other three corners, to give the kite shape shown below.
![more squash fold Origami Lily flower photo diagrams 3](http://www.origami-instructions.com/images/lily/thumbnails/03-origami-lily.jpg)
![completed squash fold Origami Lily flower photo diagrams 4](http://www.origami-instructions.com/images/lily/thumbnails/04-origami-lily.jpg)
![four squash folds completed to make kite shape Origami Lily flower photo diagrams 5](http://www.origami-instructions.com/images/lily/thumbnails/05-origami-lily.jpg)
Now fold the lower edges of the kite into the centerline, then unfold. Fold the top corner down, then unfold.
![lower edges of kite folded into centerline Origami Lily flower photo diagrams 6](http://www.origami-instructions.com/images/lily/thumbnails/06-origami-lily.jpg)
![previous fold unfolded Origami Lily flower photo diagrams 7](http://www.origami-instructions.com/images/lily/thumbnails/07-origami-lily.jpg)
![top of kite folded down to make crease Origami Lily flower photo diagrams 8](http://www.origami-instructions.com/images/lily/thumbnails/08-origami-lily.jpg)
You will now have crease marks on the piece, that will be used in the next step. Place your finger under the lower point of the kite, and fold upwards as shown. This is a petal fold.
![crease marks ready for petal fold Origami Lily flower photo diagrams 9](http://www.origami-instructions.com/images/lily/thumbnails/09-origami-lily.jpg)
![beginning petal fold Origami Lily flower photo diagrams 10](http://www.origami-instructions.com/images/lily/thumbnails/10-origami-lily.jpg)
![more petal fold Origami Lily flower photo diagrams 11](http://www.origami-instructions.com/images/lily/thumbnails/11-origami-lily.jpg)
Now repeat the petal fold three more times to give another,
smaller kite.
![petal fold completed Origami Lily flower photo diagrams 12](http://www.origami-instructions.com/images/lily/thumbnails/12-origami-lily.jpg)
![four petal folds completed Origami Lily flower photo diagrams 13](http://www.origami-instructions.com/images/lily/thumbnails/13-origami-lily.jpg)
Now fold one point of the kite downwards as shown. Repeat 3 more times for a diamond shape.
![folding point of kite down Origami Lily flower photo diagrams 14](http://www.origami-instructions.com/images/lily/thumbnails/14-origami-lily.jpg)
![kite point folded down](http://www.origami-instructions.com/images/lily/thumbnails/15-origami-lily.jpg)
![4 kite points folded down Origami Lily flower photo diagrams 15](http://www.origami-instructions.com/images/lily/thumbnails/16-origami-lily.jpg)
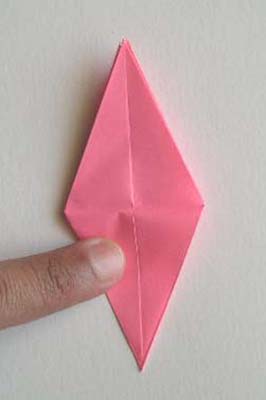
Next fold the upper edges of the diamond into the
centerline. Repeat three more times.
![top edges of kite folded to centerline Origami Lily flower photo diagrams 16](http://www.origami-instructions.com/images/lily/thumbnails/17-origami-lily.jpg)
![all top edges of kite folded in Origami Lily flower photo diagrams 17](http://www.origami-instructions.com/images/lily/thumbnails/18-origami-lily.jpg)
Now turn the piece upside down. Start folding out the four petals of the flower as shown.
You can create a nice curling effect
in the petals like this: hold the base of a petal in your left fingers, then run
your right thumb and pen (or pencil) along the length of the petal.
Your
thumb is in front and the pen in the back. (In the picture below, we've
omitted the left hand for clarity).
Repeat this motion several times to
cause the paper petal to curl.
![beginning to fold lily petals out Origami Lily flower photo diagrams 18](http://www.origami-instructions.com/images/lily/thumbnails/19-origami-lily.jpg)
![using a pen to curl the petals of the lily Origami Lily flower photo diagrams 19](http://www.origami-instructions.com/images/lily/thumbnails/20-origami-lily.jpg)
And now your origami lily is complete!
![completed origami lily Origami Lily flower photo diagrams 20](http://www.origami-instructions.com/images/lily/thumbnails/21-origami-lily.jpg)
The origami lily is very popular and has been folded by many visitors of this website. Check out the readers' photo page.
Readers have even folded and used origami lilies at their wedding!
Sumber : Origami-instruction.com
Langganan:
Posting Komentar
(
Atom
)
Tidak ada komentar :
Posting Komentar